
Every Portland driver has been there. An expired Mt. Hood Meadows season passes on the windshield. A faded PSU parking decal that’s outlived your degree. The dealership sticker your spouse insists has to come off. A bumper sticker from a campaign you no longer support.
How to remove stickers from car paint is one of those tasks that looks simple on YouTube and turns into a disaster within five minutes if you use the wrong tool. In our Tualatin shop, we see at least 2 to 3 vehicles a month where a DIY sticker removal attempt left scratches, clear coat damage, or sticky residue that needed professional polishing to fix.
This is the complete guide: the right method, the right tools, the mistakes to avoid, and when to stop and call a professional before you make it worse.
What’s the Safest Way to Remove a Sticker from Car Paint?
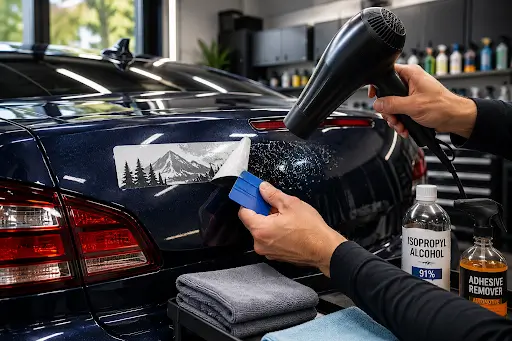
The safest way to remove a sticker from car paint is to wash the area first, apply gentle heat from a hair dryer to soften the adhesive, lift one corner with a plastic scraper or credit card, peel the sticker slowly at a 45-degree angle, then remove residue with isopropyl alcohol and a microfiber cloth. Always finish by washing the area and applying wax or sealant to restore the clear coat.
The whole process takes 10 to 20 minutes for a new sticker and 30 to 60 minutes for an older one. The key is patience. Most paint damage from sticker removal happens because someone rushed step 2 (heat) or step 3 (peeling).
For new stickers (less than 12 months old), this method works almost every time. For older stickers, baked-on dealership decals, or stickers exposed to years of Oregon sun, you may need to repeat the process or escalate to stronger adhesive removers. The clear coat under an old sticker is also slightly UV-protected compared to the surrounding paint, which often leaves a faint outline visible after removal. We’ll cover how to address that in a later section.
What Tools Do You Need to Remove Stickers Safely?
You don’t need an expensive kit. The basic gear that handles 95 percent of sticker removal jobs is easy to find at any auto parts store.
- Hair dryer with adjustable heat (not a heat gun, which gets too hot and can damage paint or trim)
- Plastic scraper, plastic razor blade, or old credit card for lifting the sticker safely
- Microfiber cloths for cleaning and drying without leaving lint or swirls
- Spray bottle with warm water for pre-wash and rinse
- Isopropyl alcohol at 70 to 91 percent concentration for residue removal
- Mild car shampoo for the initial wash and final cleanup
- Car wax or sealant to restore paint protection where the sticker was
- Optional: 3M Adhesive Remover or Goo Gone Automotive for stubborn residue
The tools to avoid on paint matter just as much as the ones to use. Metal razor blades are the single biggest cause of DIY sticker damage. They scratch clear coats even at low angles. Acetone and nail polish remover eat through a clear coat almost instantly. Brake cleaner and solvent-based degreasers strip wax, sealant, and ceramic coatings. Heat guns at high settings can warp plastic trim, crack windows, or burn paint. Wire brushes and abrasive pads create permanent swirl marks.
If you find yourself reaching for any of those, stop and call a professional. That’s the moment that turns a $0 DIY job into a $300 paint correction repair.
How Do You Remove Stickers from Car Paint Step-by-Step?
Here is the proven detailer method we use in the shop when stickers come off as part of a paint correction or full detail. Follow these six steps in order and you’ll handle 95 percent of sticker situations without damage.
Step 1: Wash and dry the area. Use mild car shampoo to remove dirt, grit, and road film from around the sticker. Skipping this step is how scratches happen. Microfiber dries the surface without leaving lint behind.
Step 2: Warm up the sticker. Hold a hair dryer 6 to 8 inches from the sticker surface on medium heat. Move it back and forth in steady motion for 60 to 90 seconds. Test the edge by trying to lift a corner with your fingernail. If it lifts cleanly, you’re ready. If it tears, keep heating.
Step 3: Lift one corner with a plastic tool. Slide a plastic scraper, plastic razor blade, or old credit card under the warm corner. Work it at a low angle, around 30 degrees, to slide between sticker and paint. Once you have a tab lifted, switch to your fingers if possible for the rest of the peel.
Step 4: Peel at a 45-degree angle. Slow, steady pulling at 45 degrees gives you the best chance of removing the sticker in one piece. If you feel resistance, stop and reheat that area. Forcing the peel is how paint comes off with the sticker.
Step 5: Remove residue with isopropyl alcohol. Soak a microfiber corner in 70 to 91 percent isopropyl alcohol. Press it onto the residue for 30 seconds to soften, then wipe in straight lines, not circles. Repeat as needed. For stubborn residue, switch to 3M Adhesive Remover or Goo Gone Automotive.
Step 6: Final wash and protection. Wash the entire area with car shampoo to remove any chemical residue. Dry with a fresh microfiber. Apply a thin coat of wax, sealant, or detailing spray to restore paint protection where the sticker was. Areas that had a sticker on for years often show a slight gloss difference from the surrounding paint, and this final step blends it back to a uniform finish.
What’s the Best Way to Remove Sticker Residue and Adhesive?
The adhesive layer is the part most people get wrong. After the sticker peels off, you’re often left with a sticky, smeared residue that won’t come off with regular cleaners. The good news is that three products handle 99 percent of automotive sticker residue.
Isopropyl alcohol at 70 to 91 percent concentration is the first choice for residue. It’s safe on an automotive clear coat and inexpensive. Apply it with microfiber, let dwell for 30 seconds, then wipe away. Most residue needs 2 to 3 passes for full removal.
3M Adhesive Remover is the professional-grade product available at most auto parts stores. It’s stronger than alcohol but still paint-safe when used as directed. Excellent for old dealership stickers and baked-on adhesive that resists alcohol.
Goo Gone Automotive in the orange citrus formula is paint-safe and widely available. Apply, let sit for 1 to 2 minutes, then wipe clean. Always wash with car shampoo afterward because the oily residue interferes with wax adhesion if left on the paint.
The products to avoid are just as important. Acetone, nail polish remover, and lacquer thinner damage the clear coat almost immediately. Brake cleaner strips wax, sealant, and ceramic coatings. Gasoline also strips protection layers. WD-40 works as an adhesive softener but leaves an oily film that requires extra cleanup with car shampoo.
After any residue removal, always wash the area with car shampoo, dry, and re-apply paint protection. Even paint-safe chemicals strip wax and sealants from the area where they were applied.
How Do You Remove Stickers from Car Windows vs Paint?
The methods are similar but the tool choice changes significantly depending on the surface.
On untinted glass, a metal razor blade is actually safe to use at a 30-degree angle. Glass is harder than the razor edge, so scratches won’t happen with proper technique. Wet the blade with soapy water for better glide and use the razor in short, steady strokes. Adhesive remover is also paint-safe on glass, which gives you more product options.
On any painted body panel, the rules change completely. Never use metal razor blades on paint, even at low angles. Plastic scrapers, plastic razor blades, or credit cards are the only safe tools. The peel-at-45-degrees method becomes more important on paint because tearing creates more residue, and you should be more cautious with heat since paint can warp under prolonged high heat from a heat gun.
Window tint film is the most delicate of all three surfaces. Treat tint like soft plastic, because it scratches and tears easily. Use only plastic tools and minimal heat. Strong adhesive removers can cause tint to lift or bubble, which means a $300 to $500 re-tint job. For valuable tint installations, call a pro before attempting DIY removal.
Most cars have stickers in mixed locations, with parking permits on the windshield, dealership decals on the rear glass, and bumper stickers on painted body panels. The smart approach is to adapt your tools by surface rather than using one method for the whole vehicle.
How Do You Remove Old or Baked-On Stickers?
Stickers that have been on for 3 or more years in Portland’s mix of sun, rain, and temperature swings are dramatically harder to remove than fresh ones. The adhesive has cured into the clear coat micro-pores. The vinyl has often become brittle and tears in tiny pieces instead of peeling in one strip.
For old stickers, escalate the process. Increase your hair dryer time from 60 seconds to 3 to 4 minutes per section, moving constantly to avoid hot spots. The adhesive needs to reach roughly 130 to 150 degrees Fahrenheit to release properly. Work in small 2-inch by 2-inch sections rather than trying to heat and peel the whole sticker at once. Heat one section, peel that area, then move to the next.
For the residue stage, switch from isopropyl alcohol to 3M Adhesive Remover or Goo Gone Automotive immediately. Don’t waste 30 minutes on alcohol when the residue is clearly too thick.
Plan for residual ghosting. Old stickers often leave a visible outline even after the adhesive is fully removed. The paint underneath the sticker has been protected from UV exposure while the surrounding paint has faded slightly over years. This is a clear coat or paint aging issue that requires polishing or paint correction to blend back to a uniform finish.
For dealership stickers on a 5+ year old vehicle, this ghosting is almost guaranteed. A single-step polish usually resolves it. For severely faded surrounding paint, a multi-step paint correction may be needed.
What Mistakes Should You Avoid When Removing Car Stickers?
The biggest mistake is using a metal razor blade on paint. It’s the single largest cause of DIY sticker damage we see in the shop. Plastic scrapers only on body panels, every time.
Skipping the wash before peeling is the second most common error. Dirt and grit under your fingers or scraper drag across paint and create swirl marks that you’ll see for years. Always wash and dry the area first, even if it looks clean.
Applying too much heat causes its own set of problems. Heat guns at high settings can warp plastic trim, crack windows, and burn through clear coats. A standard hair dryer on medium heat is plenty for almost every sticker removal job.
Pulling straight back instead of at 45 degrees tears the sticker and leaves more residue than necessary. The 45-degree angle separates stickers from paint cleanly with the least adhesive transfer.
Using acetone or nail polish remover on paint is one of the most expensive mistakes. We’ve seen multiple Portland vehicles come into our shop with permanent dull spots from this exact mistake. The clear coat is genuinely damaged and requires polishing or even repainting to fully address.
Forgetting the final wax or sealant step seems minor but matters more than people realize. The paint where the sticker was sat protected from UV for years. The surrounding paint has aged from sun exposure. Adding fresh sealant blends the area visually and protects the bare clear coat from accelerated wear now that it’s exposed.
When Should You Call a Professional for Sticker Removal?
Five scenarios make professional service the smarter call than DIY.
The first is when the sticker is on a ceramic-coated vehicle. Aggressive scraping or chemical adhesive removers can damage the ceramic coating layer and void your warranty. If your car has ceramic coating, book a professional sticker removal service to preserve the coating you paid for.
The second is when the vehicle is high-value or recently purchased. A $50 to $150 professional removal beats $500 or more in paint correction if something goes wrong on a new luxury vehicle, EV, or recently leased car.
The third is when the sticker is sun-baked or 5 or more years old. Heavy ghosting and adhesive penetration require professional polishing to address properly. The DIY method may get the sticker off, but the visual outline often remains and bothers the owner enough to bring it in anyway.
The fourth is when you’ve already started and hit a problem. Torn sticker pieces, scratches forming, or paint that’s lifting are all signs to stop immediately. Continuing usually makes the damage worse and increases the cost of professional repair.
The fifth is when there are multiple stickers across the vehicle. A full bumper covered in old decals can take 4 to 6 hours to remove safely. At that point, professional service is often cheaper than your time, and the result is dramatically better. Fleet operators in particular benefit from professional removal because vehicle resale value depends on clean, decal-free paint. Our fleet detailing service handles this efficiently for HVAC, plumbing, and delivery fleets.
How Much Does Professional Sticker Removal Cost in Portland?
Pricing depends on sticker age, quantity, and whether paint correction is needed after the removal itself.
Standalone sticker removal runs $50 to $150 per vehicle for 1 to 3 stickers in reasonable condition. Pricing is largely time-based, with most jobs taking 30 to 90 minutes. For sticker removal combined with a light polish, expect $150 to $300 to handle ghosting and clear coat blending. For sticker removal combined with full paint correction, the range moves to $400 to $800 for vehicles with multiple old stickers, visible ghosting, and surrounding paint damage that needs blending.
For most Portland drivers who add sticker removal to a full detail package, small standard stickers are often included without additional charge. Larger or older stickers may add to the quote, but the bundled service typically costs less than booking sticker removal separately.
We give you a flat quote during inspection before any work begins, so you know exactly what you’re paying.
Frequently Asked Questions
Yes, with proper heat, plastic tools, and adhesive remover. Metal razor blades on paint are the main cause of damage.
No, when used as directed. Apply, let sit 1 to 2 minutes, wipe clean, then wash with car shampoo afterward.
Yes for residue, but it leaves an oily film. Wash thoroughly with car shampoo after use.
Increase heat time, work in small sections, use 3M Adhesive Remover, and expect possible ghosting that needs polish to remove.
Not recommended. Heat guns get too hot and can damage paint or warp trim. Hair dryers on medium heat are safer.
Isopropyl alcohol works for most residue. Goo Gone Automotive or 3M Adhesive Remover handle stubborn cases.
Sometimes yes, a slight outline from UV protection underneath. A polish or wax typically blends it.
Yes. Stickers on ceramic-coated paint typically release cleaner with less residue. But aggressive removal can damage the coating itself.
For 1 to 2 new stickers, DIY is fine. For old, multiple, or high-value vehicle situations, professional service prevents costly paint correction.
30 to 60 minutes for standard stickers, 2 to 4 hours for vehicles with multiple old decals plus paint correction.
Final Thoughts
How to remove stickers from car paint comes down to patience and the right tools. Heat softens the adhesive. A plastic scraper lifts the edge. Slow peeling at 45 degrees removes the vinyl. Isopropyl alcohol cleans the residue. A final wash and wax restores the paint protection.
For new stickers, the DIY method works almost every time. For old, sun-baked, or multiple stickers on a high-value vehicle, professional service is the smarter call. The $50 to $150 spent on professional removal almost always beats the $300 to $800 in paint correction needed when DIY goes wrong.
If you have stickers you want removed or paint damage from a previous DIY attempt, book a paint inspection with Car Detox at our Tualatin shop. We serve Beaverton, Tigard, Lake Oswego, Sherwood, West Linn, Bull Mountain, and the broader Portland metro.